
You can buy the Thumb Joystick Module from: http://www.nuelectronics.com/estore/index.php?main_page=product_info&cPath=7&products_id=33
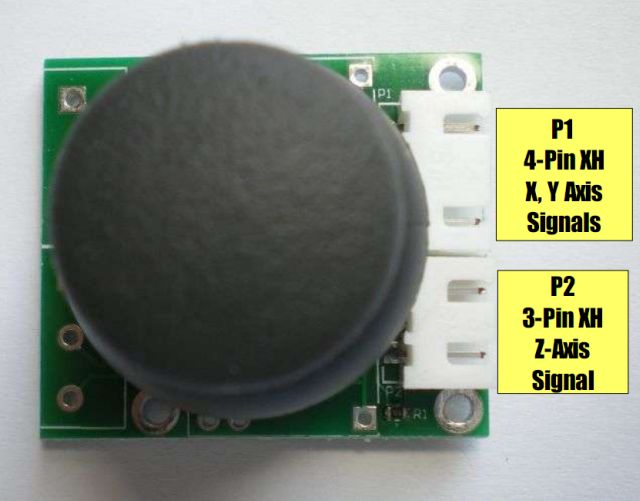

The Arduino code block is reading the Thumb Joystick values from Port A0 and A1 and sending it to Processing using the Serial class.
The Processing code block is getting the X-Axis and Y-Axis values from Serial protocol and using these values for rotating a box.

Arduino code:
// Define Arduino Port A0 as input for X-Axis
#define pinAxisX 0

// Define Arduino Port A1 as input for Y-Axis
#define pinAxisY 1

// Define variables for storing X and Y values
int valueAxisX, valueAxisY = 0;

// The setup() function is called when a sketch starts.
// Use it to initialize variables, pin modes, start using libraries, etc.
// The setup function will only run once, after each powerup or reset of the Arduino board.
void setup()
{
  // Sets the data rate in bits per second (baud) for serial data transmission.
  Serial.begin(9600);
}

// After creating a setup() function, which initializes and sets the initial values,
// the loop() function does precisely what its name suggests, and loops consecutively,
// allowing your program to change and respond. Use it to actively control the Arduino board.
void loop()
{
  // Reads the X-Axis value from the specified analog pin and
  // stores in valueAxisX variable
  valueAxisX = analogRead(pinAxisX);

  // Prints data to the serial port as human-readable ASCII text.
  Serial.print(valueAxisX);
  Serial.print(",");

  // Reads the Y-Axis value from the specified analog pin and
  // stores in valueAxisY variable
  valueAxisY = analogRead(pinAxisY);
  Serial.println(valueAxisY);

  // Pauses the program for the amount of time (in miliseconds) specified as parameter.
  delay(50);
}
Processing code:
// The Processing serial library allows for easily reading and writing data to and
// from external machines.
// It allows two computers to send and receive data and gives you the flexibility
// to communicate with custom microcontroller devices, using them as the input or
// output to Processing programs.
import processing.serial.*;

// Define variable for receiving data using the communication protocol
Serial serialPort;

// Define variables for storing x and y angles
float angleX, angleY = 0;

void setup()
{
  // Defines the dimension of the display window in units of pixels.
  // The size() function must be the first line in setup().
  size(640, 480, P3D);

  // Specifies the number of frames to be displayed every second.
  // If the processor is not fast enough to maintain the specified rate,
  // it will not be achieved.
  // For example, the function call frameRate(30) will attempt to refresh 30 times a second.
  // It is recommended to set the frame rate within setup().
  // The default rate is 60 frames per second.
  frameRate(30);

  // Gets a list of all available serial ports.
  // Use println() to write the information to the text window.
  println(Serial.list());

  // Class for sending and receiving data using the serial communication protocol.
  // Constructor Serial(parent, name, rate)
  // parent = PApplet: typically use "this", name = String: name of the port (COM1 is the default),
  // rate = int: 9600 is the default
  serialPort = new Serial(this, Serial.list()[1], 9600);

  // Sets a specific byte to buffer until before calling serialEvent().
  // Don't generate a serialEvent() until get a newline character
  serialPort.bufferUntil('\n');

  //  // The background() function sets the color used for the background of the Processing window.
  //  background(128);
}

void serialEvent(Serial serialPort)
{
  // Reads from the port into a buffer of bytes up to and including a particular character.
  // If the character isn't in the buffer, 'null' is returned.
  String inputString = serialPort.readStringUntil('\n');

  if (inputString != null)
  {
    // Removes whitespace characters from the beginning and end of a String.
    // In addition to standard whitespace characters such as space, carriage return,
    // and tab, this function also removes the Unicode "nbsp" character.
    inputString = trim(inputString);

    // The split() function breaks a string into pieces using a character or string as the divider.
    // filling substrings into a float array
    float[] values = float(split(inputString, ","));

    // we are waiting for two elements
    // put the numbers in the values array-variable
    if (values.length >= 2)
    {
      // Re-maps a number from one range to another.
      angleX = map(values[0], 0, 1023, 0, PI * 2);
      angleY = map(values[1], 0, 1023, 0, PI * 2);
    }
  }
}

// Called directly after setup() and continuously executes the lines of code contained inside
// its block until the program is stopped or noLoop() is called.
// The draw() function is called automatically and should never be called explicitly.
void draw()
{
  // The background() function sets the color used for the background of the Processing window.
  background(0);

  // Sets the default ambient light, directional light, falloff, and specular values.
  lights();

  // Specifies an amount to displace objects within the display window.
  // The x parameter specifies left/right translation,
  // the y parameter specifies up/down translation,
  // and the z parameter specifies translations toward/away from the screen.
  translate(width/2, height/2, 0);


  // Rotates a shape around the x-axis the amount specified by the angle parameter.
  rotateX(abs(angleX));

  // Rotates a shape around the y-axis the amount specified by the angle parameter.
  rotateY(abs(angleY));

  // A box is an extruded rectangle. A box with equal dimension on all sides is a cube.
  box(200, 100, 150);

  print("rotateX = ");
  print(angleX);
  print("\t");

  print("rotateY = ");
  println(angleY);
}
No comments:
Post a Comment